
“It takes 20 s to make a lung scan with echo but
it took me 20 years to convince my colleagues
on the usefulness of the technique”
Lichtenstein
INTRODUCTION
Lung ultrasound is an essential application of critical bedside ultrasound than can help associate urgent conditions with immediate therapeutic decisions. Even though the kid is not a young adult, their lung (including newborns) is like an adult one but smaller from an ultrasound point of view. Lung ultrasound has the same principles in adults and children.
However, we have to keep in mind some of the pediatric age's distinctive features. The most relevant one is the presence of thymus at certain ages, which can be confused with a consolidation.
It is essential to understand and remember that air does not allow the propagation of ultrasound (US), unlike water, where it does so extraordinarily.
BASIC PRINCIPLES
Both the adult and the child's lungs follow the same principles, and the pathologic findings are the same. However, these signs need to be understood in the patient's clinical picture that can be very different depending on the patient's age.
Keep these principles in mind while reading the rest of the chapter, you will understand them better later on. Come back to them for a better understanding of the material.
-
The lung is made up of a mixture of air and tissue. The air alone cannot propagate ultrasounds.
-
Lung ultrasound is based on artifacts interpretation.
-
The typical artifact is A line that demonstrates the presence of air (any air!)
-
The air's tendency is to go up (pneumothorax) and for fluid to go down (effusion).
-
All signs arise from the pleural line.
-
There are static and dynamic signs (do not forget to assess movement!).
-
The air-fluid ratio in the lung varies depending on whether the lung is normal or pathologic.
EQUIPMENT
PROBE
Medium to high frequencies
(7-12 MHz)
Linear in childs
Convex could be used in large childs/young adults.
PRESET
Lung
(If it does not exist, use the surface structures preset and disconnect all the attenuating functions of artifacts)

Image 1:
Image 1:

ANATOMIC LANDMARKS
Each hemithorax is systematically divided in six regions: two anterior, two lateral, and two posterior, according to anatomical landmarks set by anterior and posterior axillary lines.
-
ANTERIOR: limited by clavicle, sternum, anterior axillary line and the anterior insertion of the diaphragm. It is subdivided into half superior and half inferior.
-
LATERAL: between anterior and posterior axillary lines and the lateral insertion of the diaphragm. It is subdivided into superior and inferior.
-
POSTERIOR: between posterior axillary line, rachis and the posterior insertion of the diaphragm. Superior and inferior.
HOW TO SCAN
A systematic lung ultrasound includes a LONGITUDINAL view of the:
ANTERIOR THORAX: sliding the probe through the mid-clavicular line.
LATERAL THORAX: sliding the probe through the mid-axillary line.
POSTERIOR THORAX: sliding the probe through the mid-posterior line.
Proceed to scan each area with the same approach:
1. Start with the probe in a longitudinal position and with the mark towards de patient’s head.
2. Slowly slide down (review each intercostal space) until you see the diaphragm.
3. Repeat the procedure for ANTERIOR, LATERAL and POSTERIOR.

Image 1:
Image 1:
Image 1:
HELPFUL TIP
The posterior view in the critically ill can be limited!
We recommend slightly elevating the child's thorax and scanning through the posterior axillary line (or as posterior as you can). If the patient is stable and can be rolled on its side, properly scanning the mid-posterior line will increase sensibility.
We can add the TRANSVERSAL view to double-check a pathologic finding or to increase the scanned lung surface. Be careful in this view: the diaphragm can be easily missed, you could be scanning the abdominal cavity while thinking you are still in the lung!

Image 1:
Image 1:
REMEMBER
When you identify a pathologic finding in one view (transversal or longitudinal) you should always double-check this finding with the other view!
THE 6 QUESTIONS AND THE 12 SIGNS
Dr. Lichtenstein, one of the fathers of lung ultrasound, proposed an easy approach to read a lung ultrasound study. We will explain each sign in detail, and we will integrate them into different clinical pictures when we present the cases.
6 QUESTIONS
12 SIGNS
1. Can you localize structures?
Bat sign
2. Is there lung sliding?
Lung sliding
Lung point
3. Are there A lines?
A lines
Stratosphere sign in M mode
4. Are there B lines?
B lines
5. Is there a consolidation?
Tissue-like sign
Lung pulse
Dynamic air bronchogram
6. Is there a pleural effusion?
Quad sign
Sinusoid sign

NORMAL LUNG (AIREATED LUNG)
1. BAT SIGN: identify, in a longitudinal view, two ribs (arciform-hyperechogenic structures with posterior shadow). These two ribs are the wings of the bat. In young kids, we can find the "sign of the young bat": near the sternum, with ribs not yet ossified, these look like ovoid structures that allow the pleural line to be seen just below them without generating acoustic shadow (or a shallow one).
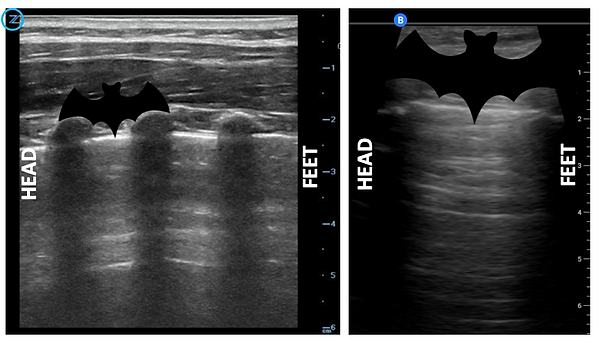
Left: lung ultrasound picture of a kid where several ribs can be seen.
Right: adult lung where usually just two ribs are seen.
2. PLEURAL LINE: it is the hyperechoic line between ribs and always slightly below them. It is both the parietal and visceral pleura as long as there is not something that separates them (air in a pneumothorax or fluid on an effusion).

Left: tranversal view of a lung.
Right: longitudinal view of a lung.
REMEMBER
The pleural line is hyperechoic due to the great difference in acoustic impedance between the soft tissues of the thoracic wall (rich in water) and the lung parenchyma (rich in air), which implies an almost total reflection of the ultrasound beam (99%).
CONCLUSION: nothing “real” can be seen below the pleural line. We don’t see the lung, we just see reverberation (A lines).
3. LUNG SLIDING: it is the dynamic sign of the pleural line. The parietal pleura moves against the visceral pleura creating this back and forth movement called lung sliding. It coincides with inspiration and expiration.
THINK ABOUT IT !
When parietal and visceral pleura are in contact there is lung sliding.
If air or water separate both pleuras, lung sliding is NOT PRESENT.
Steps to observe lung sliding:
-
Probe in transversal position in 2D mode.
-
Localize the ribs.
-
Localize pleural line and observe if there is movement.
-
If movement is not clear enough, try this sequence:
a. Decrease the depth: pleural line would be magnified and movement easier to be seen.
b. Decrease the gain: pleural line would be more contrasted.
c. Try M mode: use lowest speed. Observe the difference between “Sea shore” signs and “Stratosphere” sign.
BE CAREFUL
In young children with respiratory failure, due to its high respiratory rate and the use of intercostal accessory musculature, it can be difficult to verify pleural sliding. In these cases, the M mode will be especially useful because it will show us a clear linear pattern difference between the part above the pleural line and the underlying part.
However you must be careful! In M mode with a high respiratory rate the Stratosphere sign could have oscilations due to the intercostal muscles pulling the pleural line.
4. A LINES: air artifact. Generated by the reverberation of the ultrasound by impacting the air. The US returns in its entirety to the probe and part of the US instead of "entering" the probe is reflected back to the lung where it returns, thus generating multiple images on the screen of the pleural line. That is, the A lines are the repetition of the pleural line; they are between them at the same distance from skin to pleural line.
Between lines A other similar ones (A’) can appear.

HELPFUL TIP
Tilt your probe until you find the A lines!
When placing the probe on the patient's chest, it is important to TILT the probe slightly to one side and the other, leaving the probe at the angle with which we can best see lines A (at 90º of the lung parenchima).
REMEMBER
Any air can cause A lines!!!
Whether it is inside the lung, between the pleurae, in the stomach, under the skin or in the room, the air always generates A lines. Be careful if you are below the diaphragm (stomach) or the patient has subcutaneous emphisema, you could see air and interpret a “normal lung” but it might not be the case!
Bone can also generate this artifact due to its also very high acoustic impedance.